Building the Deck Beam Jig,and Laminating Your Deck.
The next thing I did was to construct a jig to laminate my deck beams on. Below is a diagram of the jig (NOT TO SCALE)
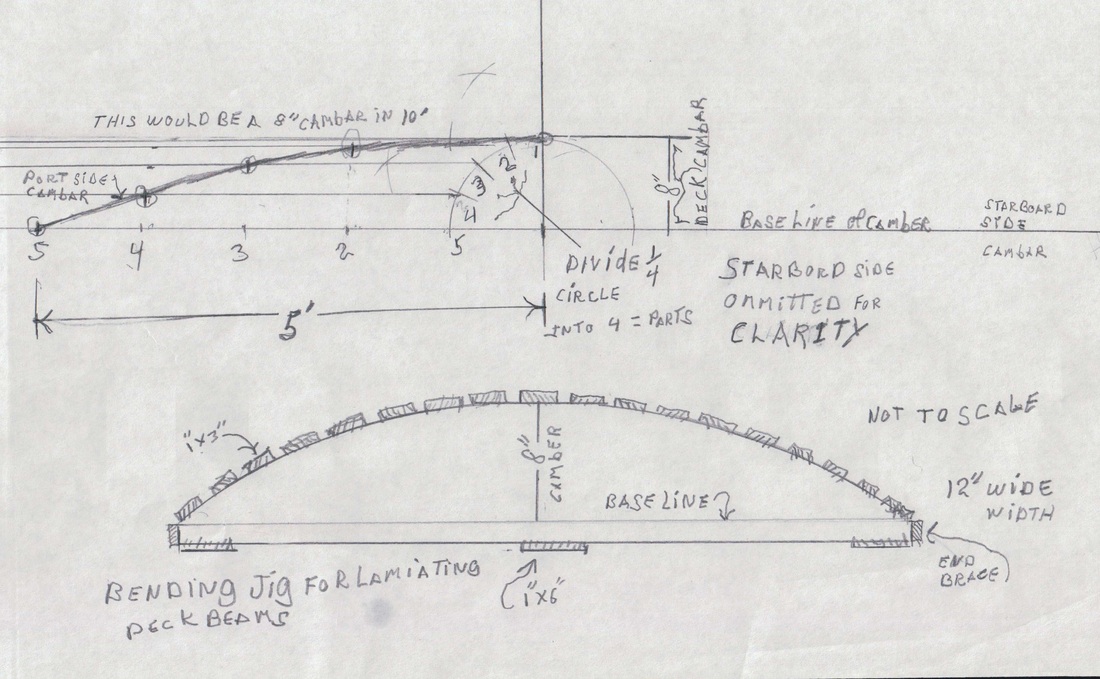
I used two 12"x 16 ' # one pine planks for the sides of my mold. My boat called for an 8" camber in 15' for my deck ,which would give me at the width wise bottom of the mold plank about a 3 1/2" straight. I then drew a base line 8" down from the top edge in the center of the plank which left me the 31/2"of straight on the bottom. Next I erected a perpendicular line off of the base line in the center of the board . I then took my dividers and scribed a half circle with an 8" radius from the baseline that I drew on the side mold board. On this illustration I am using an 8" camber in 10'. I next divided up the port 1/4 circle into four parts and numbered them 1 thru 5 top to bottom. I then next from each point drew a parallel line extending 51/2' from each intersected point on the 1/4 circle . Next divide half of the base line into 4 equal space's in 5' from the center line out. Mark the points as in the pic. Take a framing square and project each point on the base line to the corresponding parallel lines. You now have five points to connect Using a long batten to spring a fair curve on all the points ,you now have your 8" camber or what ever camber you boat calls for. You can now cut it all out and put it together . I would recommend screwing and gluing the jig together. Note: you should use dividers with two steel points on each leg. the reason for this is an accurate camber line. In my view and experience when constructing layout on anything always use a scratch awl for scribing you lines or when needed ,steel point dividers. And as always work from your center line out.
Once you have the jig constructed you can start laminating your deck beams. I used fir 1"x2" fir strips to construct my deck beams,and make sure to make them a little longer than what they need to be because the more layers you use the shorter the ends get. I laminated four layers of fir for my deck beams. I used 6" c-clamps to hold my laminated strips together . I was able to construct two deck beams at a time on the 12" wide jig. I covered the wooden 1"x3" clamping boards with wax paper so the excess epoxy would not glue the deck beams to the jig. I used West Epoxy mixed with cotton fiber to laminate the strips together. I would recommend doing a dry run on two strips so one could be aware of what he will be dealing with when there is glue is involved because the strips tend to want to slip around To get started with the gluing you may start from the center of the strips with a bronze boat nail ., drill a 1/8 hole in the top board to put the nail through and nail it to the bottom board, just don't nail the first two to the jig. :) after you have the center secured you can start clamping , alternating the clamping port then starboard,then port and so on. Male sure the strips stay even on their side's,you may have to use some short boards covered with wax paper clamped to the side's to squeeze them even . Do not laminate one side at the time,you may end up with bad results. Happy Laminating!!!
While you are fabing the deck beams in between waiting for the deck beams to cure you can install the boats center line which should be marked on you boat mold . I used piano wire and a turn buckle to tighten it up with.I used an1/4" eye bolt and thru bolted them through the bow and the stern. This will help you to line up the deck beams on center with the boat,the deck beams should be marked with a center line.
|
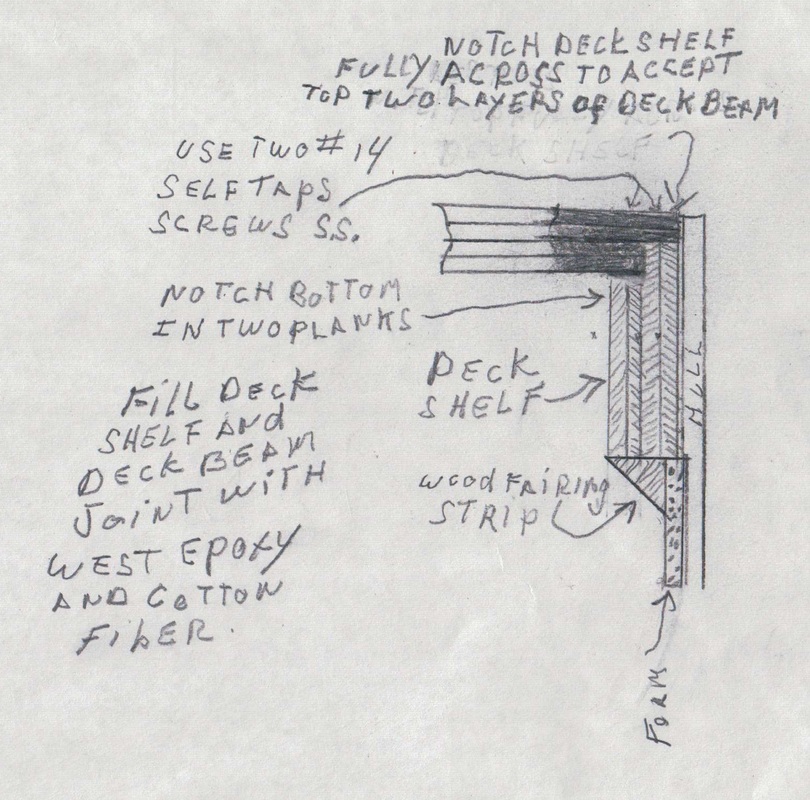
As you complete a deck beam you can start installing it while the others are curing. I started with the longest one first. The pic next to this paragraph shows how I Installed the deck beam to the deck shelf. Do not be tempted to use furniture glue because it is cheap,use west epoxy or another brand but it should be epoxy for all structural components. Furniture is another thing I will get into later where I used polyurethane glue ,that will be later on in this site. The deck beams should be or was on my boat 24" on center using the piano wire center line to square off of. It is important to have the notches in the deck shelf on the 24' centers so your 4'x 8' sheets of plywood will butt to each other on the center line of the deck beams . Once you have all the deck beams installed you can then start decking the boat. I started my sheets with the 8' length perpendicular to the piano wire. I started the sheet in the center of the boat on the center line working the plywood sheet to the camber of the deck beams a little at the time each way so you will not distort the deck beam , by bending one side at a time and fastening it back and forth. I used two layers of 1/2" 4' x 8' fir plywood. I used bronze boat nails to fasten the plywood to the deck beams,but you would be better served to use an air staple gun with Monel staples because when you hammer the deck beam tends to bounce. The stapler is just way better way to fasten your deck down,not to mention it pulls the material down tight. when you apply the second layer you should stagger the sheet so it covers any butt joints that don't fall on a deck beam,so when you staple the top sheet it pulls the bottom butt joint up tight against the top sheet. When your epoxy and cotton fiber cures the staples have done their job because it is the epoxy laminate where the strength is.. Let me mention here that when using epoxy it would be wise to use one with a real slow hardener and also have some help .Take it from me you don't want to do it by your self :). Also try to plan a day that's not real hot and pick a time of day when the humidity is not high . Also when I glassed the deck I coated the plywood with West Epoxy two times and then I washed the epoxy off after it cured and let it dry good. Next I sanded the gloss just enough to rough it up before I glassed it with chop mat and a heavy fiberglass cloth about 24 oz. If I was doing it today i would use a couple of layers of Bi-Ply glass. After the Glassing of the deck I then tied the deck to the hull joint with mat,18 oz wroving, mat and cloth,then faired the joint out and painted it and the deck with a white epoxy primer, U.S. Paint Co. 545.
|
" ©2015 shipshapetipsboatbuildingandrepairs.com “All Rights Reserved”
|